I was so blessed to recently gain a daughter-in-law, and I wanted to do something special for my son and his new bride for Christmas to celebrate their love for each other and the sanctity of their marriage. They had generously given me lots of photos from their wedding, so I had some great pictures of the beautiful bride and groom. I also had a decorated jar from their wedding we'd used to drink out of, a special jar lid that could convert the jar into a lamp, and a small lampshade. So I decided to create a small lamp to commemorate their special day!
First, I made a pattern for the lampshade. I laid the small lampshade on an 8-1/2" x 11" paper and traced a pattern, rolling the shade over the paper and using a pencil to lightly trace the upper and lower edges and leaving a little bit at the ends for overlap.
Then the fun part - choosing the pictures! there were so many good ones, it was hard to decide. Finally I made my selections, and laid them out in a pleasing design that would fit on my lampshade pattern.
I made a paper black and white copy, as I thought that would add a nice harmonious touch to the burlap and lace decor on the wedding jar. This way I could also check the fit before making my final copy, and see how it would look when the light was on. I did leave plenty of extra borders on every edge to make sure I had extra margins before printing my good fabric lampshade.
Next, I used a special fabric sheet for ink jet printers to print my finished pictures. This would make it easier to attach to the lampshade, and it would last longer. I printed out the pictures onto the fabric sheet, following the manufacturer's directions. Then I cut out the shade and glued it to the lampshade on the upper and lower edges. I let the glue dry, then added a jute rope finish to the edges for a finishing touch that would compliment the burlap trim on the jar base.

The next step was to fill up the jar. My small "Connect" church group had helped me with a project last year where we brainstormed words that defined love; this was the perfect use for my list of 100+ words! I printed the words out on a sheet of melon-colored cardstock; this was the bride's chosen color for their wedding. On the reverse side of the sheet, I printed a scrapbook page of simple small hearts. I then traced 2" hearts on top of the words, fitting in as many full expressions as I could on each fussy-cut heart shape. There were so many beautiful meanings offered by my friends, and how special that I was able to "re-gift" their gift to me!
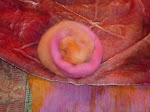
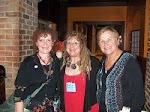
Then I cut out the hearts and folded them just a bit to add some dimension so that they didn't just lay flat inside the jar. I also used dark blue silk rose petals mixed in with the hearts to fill the jar, my son's chosen color for their wedding. You can see the wedding colors in my corsage in the image above at upper right.
Finally, I filled the jar with the hearts and rose petals. Then I added a special jar-lid top that has a place to add a light bulb; I used a low-light tapered bulb, so this is more of a night light or "mood" light. Lastly, I popped the shade on top and it was all done!
I love the warmth that the yellow-hued light bulb gives the photos on the shade, it really adds a nice vintage touch. And I know the base is filled with lots of expressions of love, many of them derived from 1Corinthians 13:4-8, the "love scripture" of the Bible. My prayer is that my son and his wife will always hold these in their heart and keep sacred the covenant of marriage.
But - this little lamp would make a great gift for other occasions, too! You could make different shades representing Christmas (use vintage Christmas cards instead of photos!), Easter (fill the jar with jelly beans or colorful basket filler), favorite pet pics, summer vacation (maybe a beach trip and fill the jar with shells?) I'm sure you'll think of something!


No comments:
Post a Comment