Sunday, December 9, 2018

Snow-dyeing

We are really having some snow here, and so I thought I'd post a quick tute on how to snow-dye! It's fun and easy, and a great technique to add some beautiful colors and icy textures to your fabrics. You can snow-dye plant-based cloth such as cotton and linen, or protein-based cloth such as silk and wool. Be sure to use the proper kinds of dyes for your fabrics; Rit dye is fine for either one, but if using something like procion, you'll need to be more picky. Protein-based fibers can also be dyed with food-coloring based things like Easter egg dye and Wilton's icing gels; you'll need to heat-set these either in the microwave for 2 minutes, by steaming, or in a low-temp (225 degrees) oven.

Basic instructions: place your fabric in the bottom of a large-ish container, such as a plastic bucket or large plastic coffee container. Crumple the fabric into the bottom of the container; this will add to the beautiful texture you finish with. Then pack snow on top of it, packing the snow pretty firmly. Next add your dye to the top. You can use more than one color for added excitement. Keep in mind how the colors might mix; red and green will make brown, as will blue and orange, so you might want to go with analogous colors such as teal and lime, or blue and yellow, which will make green when mixed. I mix the dyes fairly concentrated, or if using powdered dye, you might try just sprinkling the powder on top. Some dyes will even separate into different shades of colors; for example, purple Wilton's icing gels separate into gorgeous hues of lavender, blue and pink.
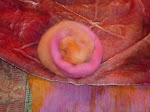
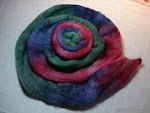
This was some silk habotai I snow-dyed with Wilton's purple icing gels, mixing a small amount of the gel with a half cup of water and 2 tablespoons of white vinegar, then pouring it onto the snow.

Once you have added the dye, you just wait for the snow to melt and the dye to slowly trickle down onto the fabric, leaving a lovely icy texture. You might want to move the container to a semi-warm area like your garage or basement to facilitate the melting. Then pour the dye off. Be sure to heat-set as necessary.
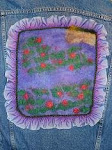
This was a pretty linen wrap skirt in celery green that I didn't wear any more so I decided to upcycle the beautiful fabric by snow-dyeing it in shades of blues and greens.
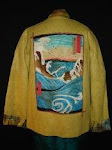
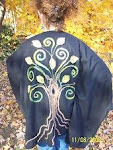
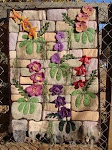
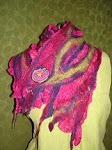
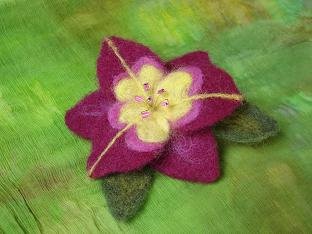
 The fabric came out so pretty! I combined it with some wool I marbled to make a simple kimono-style jacket like my #220 "Cut-up Kimono Jacket" pattern, shortening the jacket body and sleeves to fit my fabric. I had the nuno-felted scarf  that matched perfectly, and the little rose flower is from my #209 "Wooly Flower Basket & Wall Hanging" pattern. The tote bag was one of my samples I did for my "Marbling on Wool" article for Quilting Arts magazine last year.

Another technique for more specific texture and color is to use a grill and a pan to catch your melted dye. For the purple and blue textiles shown, I placed a grill or screen over a large roasting pan. I wt my fabric, then fan-folded it into diagonal pleats radiating from one corner, then pleated this down from the corner to fit my grill. I then piled snow onto the fabric, added my dye in ombre shades of blue and purple, and let the snow melt.


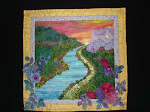
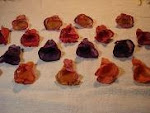
 This was cotton fabrics I dyed with Procion dyes, I used 5 rectangles and some strips to fussy-dye fabric to make my #212 "Quick & Easy Ladies' Vest" pattern.
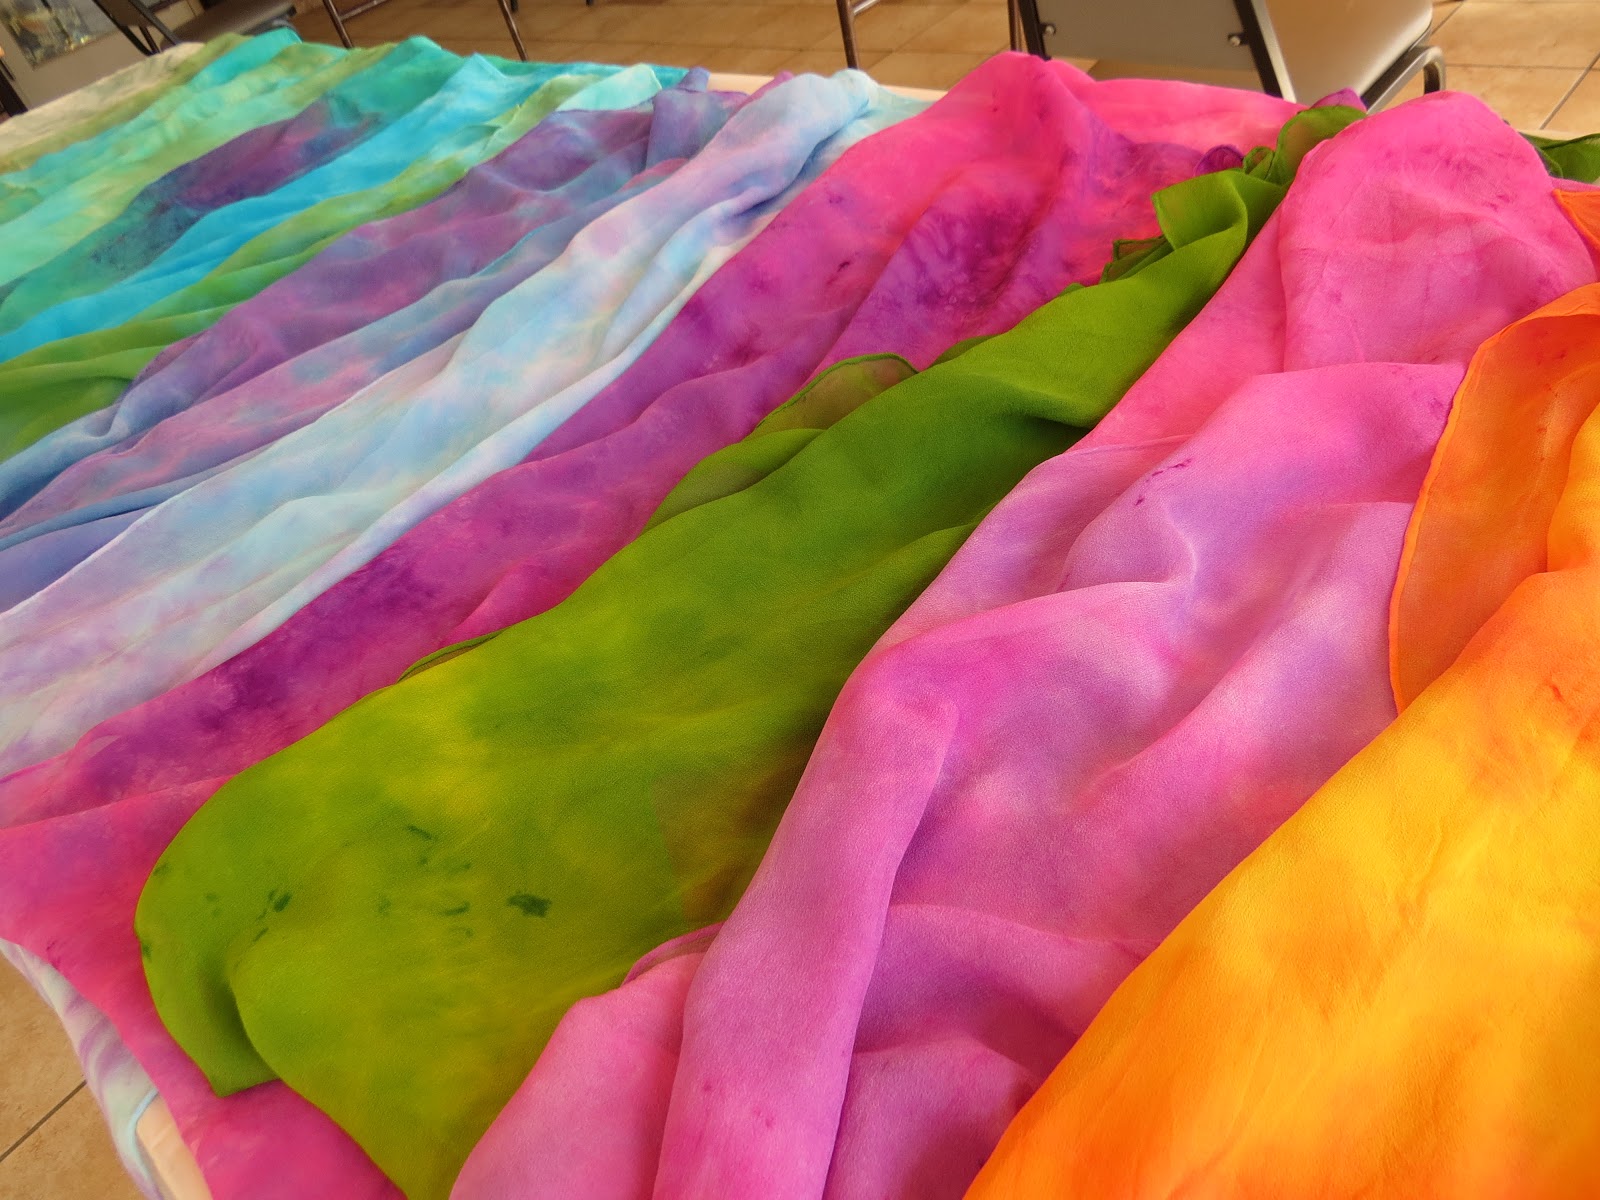
                                                     My finished snow-dyed fabrics!

 Close-up, can you see the cross in the pattern? Dyeing is so serendipitous, you never know what you're going to get!
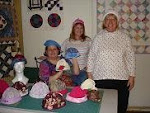
                                          My "Quick & Easy Ladies' Vest" pattern #212

There are so many fun things you can do with snow-dyeing! Hmm...I wonder what I'll try next, with 8" of snow and it's still coming, it's a perfect day to try a new technique!


Saturday, March 10, 2018

MAQF 2018 Nuno-felted Scarf Class


I had such a great class Friday at the show, my Nuno-felted Scarf class was packed with 21 students! They were so incredible, sharing workspace as needed and also inspiration and ideas. Each student chose their favorite hand-dyed silk chiffon scarf, and then their fibers and embellishments from my "fiber buffet". Every scarf was so different, and absolutely gorgeous! I am so very proud of all of my students, not only for their beautiful art, but in the way they supported each other and worked together. Here is a sampling o their work, still wet...I can only imagine how wonderful the scarves looked after they dried and the colors and luster of the fibers came out!
 This was such a beautiful and elegant scarf, can you believe she finished first?
 Whimsical flowers and vines on a sea of blue.
 A wonderful abstract art piece, full of textures and vibrant colors!
 What a beautiful layout in this flower garden on an earth-tone silk scarf!
 Beautiful colors in this very wearable art scarf!
 I love this composition, she created fish swimming in an ocean of blue!
 This snow-dyed silk scarf was transformed into a wearable work of art by this student!
 What a sumptuous ruffle in this romantic piece!
 Rich, vibrant wool colors on a hot red and yellow silk scarf, love it!
A group of sisters and their friend were sweet enough to come by my booth at the show Saturday and show me their gorgeous scarves after they'd dried, wow!
My new "fashionista" friend Anne came by my booth to see me too, what a blessing it was to meet her! Truly, we are kindred spirits.

MAQF 2018 Needle-felt Landscape Class

What a great time we had in our Needle-felt Landscape Class at the show! It was a full class, and the students only had a half-day to create their little mountain scenes from my "fiber buffet" of wool, curly mohair, silk, bamboo and sparkly Angelina fibers. They each got a pattern to use as a placement guide, a rectangle of Woolfelt to punch the fibers into, and a felting needle with other tools available as needed. The students chose their own personal color palette from the "all you can felt" fiber buffet, and happily punched away all afternoon. It was a very low-stress and artsy class, and they all created beautiful landscapes, each a little bit different! I am so very proud of each of my students, here is a little sampling of their work.
 Beautiful accents and use of curly fibers for the little flowers in the foreground!
 I love this warm, glowing sky in this work-in-progress, and the heathery fiber blending!
 I especially love her mountains in this piece.
 This is a very exciting landscape, lots of visual texture!
A beautiful design, and gorgeous composition of the silk and wool flowers and curly fibers in the foreground.

MAQF Quilts

What a busy show I had at Mid-Atlantic Quilt Festival 2018! Thankfully, I was able to catch a glimpse of a few of the quilts on display the last morning of the show, here are a few that captured my eye.
 I loved the linear design on this beautiful floral piece.
 The detail of this fabulous quilt was absolutely amazing!
 ...and the quilting, unbelievable, wow!
 A very different art quilt.
 So serene, just beautiful.
 I believe this quilt was done by a man, what a great idea! And a little bit retro.
 This little quilt was just stunning.
A Florida native created this piece to represent strength and beauty. How fitting, and timely.

Wednesday, February 14, 2018

Colors of Nuno-felting

I'm so excited to be teaching my Nuno-felted Scarf class at Sawtooth this weekend and also at the Mid-Atlantic Quilt Festival in Hampton, VA next week! "Nuno" is a Japanese term for "cloth"; when we nuno-felt, we start with a hand-dyed silk chiffon scarf as a base, and then "fuse" fibers of hand-dyed wool merino, silk, bamboo, curly mohair, and Angelina to make a beautiful one-of-a-kind art scarf that students will be able to wear out of class. (OK it might be a bit wet though!) I dye all the scarves for my classes by hand, and I usually bring a solid black one or 2 just in case. I love color! And I try to bring a nice variety of hues for students to choose from.


Once students have chosen their scarf, they then hand-pick their choice of wool fibers and embellishments to add to their palette. I always bring lots of photos and samples for inspiration too.

The layouts vary from free-form abstract in analogous hues:
 To a vibrant explosion of flowers on a sea of blue:
Or a simple geometric grid:
Or perhaps colorful circles:
And yes, we do believe in "coloring" outside the lines! I can't wait to see what my students will come up with next!

Sunday, February 11, 2018

A Special Gift

I was so blessed to recently gain a daughter-in-law, and I wanted to do something special for my son and his new bride for Christmas to celebrate their love for each other and the sanctity of their marriage. They had generously given me lots of photos from their wedding, so I had some great pictures of the beautiful bride and groom. I also had a decorated jar from their wedding we'd used to drink out of, a special jar lid that could convert the jar into a lamp, and a small lampshade. So I decided to create a small lamp to commemorate their special day!

First, I made a pattern for the lampshade. I laid the small lampshade on an 8-1/2"  x 11" paper and traced a pattern, rolling the shade over the paper and using a pencil to lightly trace the upper and lower edges and leaving a little bit at the ends for overlap.
Then the fun part - choosing the pictures! there were so many  good ones, it was hard to decide. Finally I made my selections, and laid them out in a pleasing design that would fit on my lampshade pattern.
 I made a paper black and white copy, as I thought that would add a nice harmonious touch to the burlap and lace decor on the wedding jar. This way I could also check the fit before making my final copy, and see how it would look when the light was on. I did leave plenty of extra borders on every edge to make sure I had extra margins before printing my good fabric lampshade.

Next, I used a special fabric sheet for ink jet printers to print my finished pictures. This would make it easier to attach to the lampshade, and it would last longer. I printed out the pictures onto the fabric sheet, following the manufacturer's directions. Then I cut out the shade and glued it to the lampshade on the upper and lower edges. I let the glue dry, then added a jute rope finish to the edges for a finishing touch that would compliment the burlap trim on the jar base.
The next step was to fill up the jar. My small "Connect" church group had helped me with a project last year where we brainstormed words that defined love; this was the perfect use for my list of 100+ words! I printed the words out on a sheet of melon-colored cardstock; this was the bride's chosen color for their wedding. On the reverse side of the sheet, I printed a scrapbook page of simple small hearts. I then traced 2" hearts on top of the words, fitting in as many full expressions as I could on each fussy-cut heart shape. There were so many beautiful meanings offered by my friends, and how special that I was able to "re-gift" their gift to me!
 Then I cut out the hearts and folded them just a bit to add some dimension so that they didn't just lay flat inside the jar. I also used dark blue silk rose petals mixed in with the hearts to fill the jar, my son's chosen color for their wedding. You can see the wedding colors in my corsage in the image above at upper right.

Finally, I filled the jar with the hearts and rose petals. Then I added a special jar-lid top that has a place to add a light bulb; I used a low-light tapered bulb, so this is more of a night light or "mood" light. Lastly, I popped the shade on top  and it was all done!
I love the warmth that the yellow-hued light bulb gives the photos on the shade, it really adds a nice vintage touch. And I know the base is filled with lots of expressions of love, many of them derived from 1Corinthians 13:4-8, the "love scripture" of the Bible. My prayer is that my son and his wife will always hold these in their heart and keep sacred the covenant of marriage.

But - this little lamp would make a great gift for other occasions, too! You could make different shades representing Christmas (use vintage Christmas cards instead of photos!), Easter (fill the jar with jelly beans or colorful basket filler), favorite pet pics, summer vacation (maybe a beach trip and fill the jar with shells?) I'm sure you'll think of something!