Tuesday, April 6, 2021

Dyeing Wool with Easter Egg Dyes


Did you know you can dye wool with Easter egg dye? These dyes are permanent on protein fibers such as wool, silk, and mohair; please note they are not permanent on plant fibers (such as cotton or linen) or synthetic fibers. This is a safe and easy way to dye your textiles in bright happy spring colors, and something fun to do with your kids too!


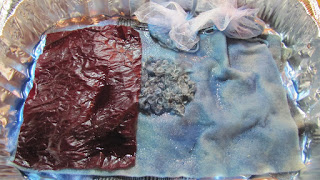
Easter egg dye comes in so many pretty colors and is permanent on protein fibers such as wool and silk when heat-set and used with a mordant – in this case, white vinegar. The purple dye even separates into beautiful hues of lavender, blue and pink! Here’s how to do it:

1. Fill a basin with room-temperature water and add a squirt of soap, such as dishwashing liquid. (I use blue Dawn concentrate.) Add the fabric to the soapy water soak for at least 30 minutes.


2. Meanwhile, mix the dye. You’ll need Easter egg dye (I use PAAS), plastic containers for mixing the dyes, plastic spoon, tablespoon, measuring cup, white vinegar, water, and paper towels. 


3. Mix the dye: place 3 tablespoons of white vinegar into a small container and add the dye tab. Let tab dissolve completely, then add ½ cup water and another tablespoon of vinegar. Mix. You can check the color by dipping a corner of a paper towel into the dye.


4. Remove items to be dyed from the basin and squeeze out the soapy water. Arrange in an aluminum roasting pan or oven-safe container you don’t plan to cook in. Add the dye to the wet fabric. You can pour it, spoon it, or paint it on with a sponge brush. Fabric should be very wet. When all the dye is added, place in oven and turn to 225 degrees. Cook for approximately 40 minutes, checking periodically to make sure the fabric isn’t scorching. You can add more water if needed.


5. When water is fairly clear, your fabric is done! Let cool completely and rinse in room temperature water. Gently towel dry fabric; lay fabric out flat to finish drying.

Easter egg dyes will give you beautifully bright colors for spring and summer, and can often be found on sale after Easter. Be sure to get the large size with more colors in the pack to be sure you get that pretty purple and a nice assortment. You can also dye protein fibers in Kool-aid, and Wilton's icing gels too! And it's great for ice-dyeing. I have noticed that the Easter egg dyes are not as colorfast as these other dyes, and will tend to fade a bit if exposed to sun for long periods of time, especially the purple color. Have fun!


 Silk scarf snow-dyed with purple Easter egg dye, I love how the colors separate!


 Detail from my "Way Back Home" pattern, wool dyed with Easter egg dye!


Tuesday, June 16, 2020

One Heart, One World

What a turmoil our nation is in these days, and rightly so. With the death/murder of George Floyd and investigation into other cases of racism and social injustice, maybe this will be a wake-up call and things will finally change for the better. I have to believe that it will, as the old CSN song goes, "It's been a long time coming". I remember the civil rights movement of the 60's, I was very young, but I remember the interstate getting shut down then, protests and such, I thought things had changed. But it seems to have gotten worse lately...or maybe the inequality and racism is just finally being exposed? I pray that this will be a positive change, and that our children will grow up to be more loving and accepting of everyone regardless of their skin color, sex or beliefs. As it's been pointed out, children aren't born to hate; it's up to us to teach them otherwise.

I'm trying to help out in my own humble way with this simple project I'm titling "One Heart, One World", a name suggested by Becky Bucci (thank you Becky!) The pattern is available as a free printable project sheet at the bottom of my Classes page on my web-site. You'll need to save it to your preferred device and print from there, checking the size. Mine finishes at 8-1/2" x 11", but you can make it any size you like. This could even be used as a teaching tool for your children, they can just color in the page you print! I used Woolfelt in various skin tone shades for my heart and hands with orange and yellow for the flames, which calls to mind a phoenix rising from the ashes. (You could also use cotton or batik fabric, but you would need to add fusible web to the back.) I used Valdani mulberry silk floss for the orange radiating warmth around the heart in long, straight stitches. I love the warm luster the silk floss adds, and the way it catches the light, adding a degree of variation to the finished look. I used a size 12 perle cotton in black for the decorative stitches in the heart, hands and flames.
I used a variety of stitches such as cross-stitch, herringbone, blanket-stitch, whip-stitch, and primitive-stitch. Really, any stitch will work, whatever you like to do and comes easily for you!

Here are the basic supplies you'll need:
* Black Woolfelt for the background, 9" x 12" square
* Small pieces of Woolfelt for the heart, hands and flames; I used skin-tone shades, orange, & yellow
* Perle cotton/silk floss, or embroidery floss (see my note above)
* Embroidery needle
* Scissors
* Pins
* Optional: freezer paper, iron, light box (or sunny window), rotary cutter with ruler and mat.
* Sewing machine if you prefer doing the decorative stitches by machine
* And of course the paper pattern, found at the bottom of my Classes page under Freebies!


The first thing you'll do after printing out the pattern is to trace the hands and flames onto the paper side of freezer paper or another piece of paper, or you can cut them from the one you printed. (If using cotton fabric, trace them onto the paper side of fusible web.) I like to use freezer paper to cut out my Woolfelt for a crisp, clean cut: just trace the design components to the paper side, cut around the traced designs leaving a narrow margin around the outside line, use a low-temp iron to iron to your Woolfelt, and cut out designs on the traced lines. Be sure to remove the paper backing before pinning these to your background.

You'll want to cut out 2 hands using paper, freezer paper, or fusible web. Also, cut out the flames, cutting the full size for the orange flame, and just the smaller one for the yellow flame. For the heart, go ahead and cut the heart out from your printed pattern, keeping both the heart and background intact. Then you can lay small pieces of your Woolfelt colors in your cutout to audition color placement. Or if you like the colors shown, I used the following shades for my heart (starting at upper left and going counter-clockwise): Beach Sand, Light Brown, Camel, Suntan, Hay Bale, and Cinnamon (Peat Moss would also look good here.) I left it open in the center to show the black background. Or you can use more colorful pieces if you prefer - how about rainbow colored? It's your art piece, feel free to use whatever hues you like!
So obviously I had already cut out my pieces and started stitching them to the background, but I did audition mine beforehand, I just didn't take a picture. But you get the idea - cut out the heart, use the background as a "stencil window" to audition colors.

Once you've chosen your color palette and placement, you can trace the heart sections onto the freezer paper and cut them out as described above. Then pin them to the background, making sure to leave room for the hands and flames at the bottom; you can use your printed pattern as a placement guide. Now you're ready to stitch away! You can also cut a solid black heart and pin the heart sections to that to do the decorative inner stitches, it's a bit easier to handle, and yes, that's how I did mine.

Once you have your heart stitched, primitive-stitch or whip-stitch it to the background around the outer edge. A primitive stitch is just a random whip-stitch with a wonky quirky uneven look! The whip-stitch around the hands. Next use a tiny cross-stitch to attach the yellow flame just to the orange flame, then pin these below the hands and use a whip-stitch to sew to the background. At this point you have a couple of options: if your piece is going to be a simple wall hanging, journal cover etc, go ahead and sew all the way around if you'd like. I left the top of mine open as a pocket of sorts to hold little "blessings" to give or receive every day. I printed out these word my small group helped me brainstorm when we were pondering what "love is", cut them out, and tucked them into my fiery pocket. Then when I receive or give a blessing throughout the day, such as encouragement, praise or the like, I can pull that word out and tuck it into my radiating love stitches around my heart! If you're helping a young person make this project, this would be a valuable lesson to be positive an share love with others!

Ok, so once you have all your components attached to the background, you're almost done! The last step is to sew the orange radiating warmth of love around the heart with long straight stitches. My rows are about 1/4" - 3/8" apart and the stitches are about 1/2" long. You can make yours smaller if you prefer, I lean towards larger stitches - I'm all about fast 'n easy!

And you're done! I hope you enjoyed making your new loving heart and that it will bring joy and warmth to your heart each time you look at it. Don't forget to sign your project! I embroidered my initials in the lower right corner. Let's fill the world with love not hate - everyone can make a positive difference!

Face-masks

Seems like everything has changed almost overnight, not only here in NC, or the US, but around the world, everything has happened so quickly. When things started shutting down and we first heard about the use of face masks to curb the spread of covid-19, I found a pattern online and made a couple to wear when I ran to the store or post office. Then my small church group decided to make gift baskets for health care providers at our local hospital and I was asked if I might make some face masks to include? I was happy to do that, my dil is a nurse in the intensive care department at her hospital, and was also expecting their first baby and my first grandchild! So I really wanted to do whatever I could to keep them safe and healthy and help "flatten the curve". The next thing I knew I was getting requests from everywhere! I ended up making a couple of hundred face masks, some even for a missionary group in NY. I think the sweetest reward I got was when the leader of the group sent me a video with a very young little girl thanking me for sending "yiddle" (her precious way of saying "little", so adorable!!) face masks, 'cause she was little and her face was little too. That video made all those hours of sewing worth every minute. I hope my small effort helped to save some lives of health care providers and also patients. Here are a few pics of some of the face masks, it was actually fun to get to do some marathon sewing for a while!
 Some of the first ones I made, I like this pattern as you can use either elastic or ties.
 Each face mask has a filter pocket in which a disposable filter can be added, such as a blue shop towel or coffee filter.
 A variety of colors chosen by one health care worker for guys and gals!
For the NY missionaries, I used some fun kids' prints for the little ones. Good thing I had a nice stash of fabrics to choose from!

I actually "killed" my sewing machine with all this marathon sewing! The last night I was trying to finish the kids' masks above, I was so tired but was trying to finish up the last few. When I went to wind a new bobbin there was some loose thread on the spool, and too late I saw a bit of it disappear into the motor of my favorite vintage machine! So right now it's not working very well at all, I'm going to have to take it to a shop. Luckily I have a back-up portable I can use until I get ol' Lucy up and running.

Oh, and I am also the proud grandma of a healthy baby boy! Carter Ray Clontz was born on April 30 and he and his proud mom and dad are doing great. He is so precious, I've seen him once and we hit it off right away! Ok he was only a week old but we got along just fine. I can't wait to go and see him again! Meanwhile my new pattern designs are being inspired by him, check out my "Baby Buddies Blankie" and "Baby Buddies Softies & Backpack" on my Patterns page of my web-site!

MAQF Wool Geode Zipper Necklace Class

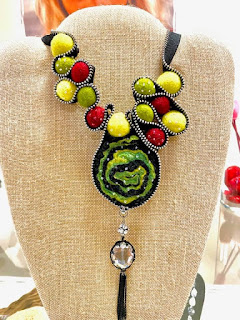
Reminiscing on this rainy day about the last show I vended and taught at, the Mid-Atlantic Quilt Festival in VA. I was telling a friend yesterday how refreshing it was to get away from the "real world", we never turned the tv or news on the whole time up there. Who knew a few short weeks later the country would be virtually shut down? But that doesn't mean our creativity has been stopped, if anything it's allowing us to spend more time than ever sewing and making things! Here are a few of the beautiful necklaces my students made in our Wool Geode Zipper Necklace Class, most did not completely finish, but we had a great time and they turned out gorgeous! I know they enjoyed adding the beads from their kits later when they could ponder over colors and placement at home at their leisure.
 I love the asymmetry of this beauty and the artsy wool beads the artist felted, a stunning piece!
 Beautiful wool beads created by this first-time felter, I love her color palette she chose!
 Joyful happy colors in this exquisite piece!
 Such sweet soft colors chosen for this beautiful necklace, and I love the bottom pendant and also the simplicity of this piece!
 Gorgeous ocean hues!
 My favorite colors, and I love those center wool beads she felted, they look like little world globes!
 Beautiful complementary colors!
 Love this necklace and you can see the artist added a bit of bling with some Angelina in her wool beads she felted!
 Love these jewel-tone beauties, so rich in hues!
Judy Donovan joined us for the afternoon session after teaching a class that morning, I love the vivid colors and beads she added to her unique stylish work of art!

All in all we had a great time, and I feel so blessed to have had such wonderful students in this very creative class. I hope they will remember our class with fondness in the times to come, and maybe one day we'll get to do another fun class together!

Thursday, March 26, 2020

Wreath of Love & Hope

Maker. Creator. Artist...maybe escape artist? As this is what doing things with my hands helps me to do. Normally I accomplish this by teaching, guiding students to release their inner "muse", or helping patients forget about their problems for a little while by expressing their creativity. I immerse myself in my students and their journeys in my classes, as I am caught up in helping them to bloom and grow in their artistic expression. In doing this, which I love, I'm able to forget about my own problems for a little while.

But now we're all called upon to stay home to "flatten the curve" of this nasty coronavirus wreaking havoc around the world, and I'm challenged to find an escape, a peaceful dwelling place within myself. And so I start work on a project requested by a special family member for her new home, a simple wreath made up of berries and leaves. I have all the supplies I need: a wreath form I found at Fancy Gap Pottery, wire covered with a moss-like substance. I only needed the small inner circle with wire extensions, and I was helped by a man at a local church who used bolt-cutters to cut away the 2 larger circles.

 This was the original wreath, and the 2 outer circles were cut away.

Close-up of the textured moss-like finish on the wire. Pretty but a bit messy.

 I used regular wire-cutters to cut off the wire extensions on the larger circles, and added them to my smaller wreath, wrapping the ends around the circle and gluing them in place with tacky glue. I also separated the original wire extensions so that there were "stems" on the inner and outer circle.

Then I began cutting out the leaves. I drew the basic leaf pattern, and traced 10 leaves onto the paper side of freezer paper. I used 2 shades of Woolfelt my family friend had chosen: Reet's Relish and Shady Grove. I ironed the waxy side of the leaves to the Woolfelt with a dry iron and cut out 10 leaves, cutting more of the darker hue (Reet's Relish) than the lighter. Removing the freezer paper to use again, I gently pressed each leaf in half to simulate a "vein", leaving the tip unpressed. I then unfolded the leaf slightly, preserving some of the dimension.


I continued to cut out leaves in sets of 10, reusing the freezer paper leaves again and again, and cutting roughly twice as many of the darker leaves than lighter ones. As I cut and pressed, I began to arrange them on the wreath form and wire extensions, alternating shades of green, filling in space, gently bending the wire "stems" to bring a nice curved flow to the piece. Very methodical, rhythmic, soothing. Nothing that demanded too much thought, yet required just enough concentration to take me away from worrying about my kids health, my elderly mom, my pregnant dil who's a nurse in the intensive care unit of her hospital, my bills getting paid, and how long is this going to go on...no. The leaves have my attention for a little while. Cut, press, arrange, glue. Repeat. I open the door and listen to the birdsong as I work. My mind is caught up in creating something harmonious and beautiful, wonderful therapy. Cut, press, place, glue. I'm in another world for a little while.

(The beginning...)

I also began to felt the white berries. I used 100% wool fibers in a natural white color, shaping several loose fiber balls at a time so that the size would be consistent. Then I patiently wet-felted them into small firm round berries. This can't be rushed, or you can get cracks and crevices in the surface. We use this technique in my wool bead earrings and necklace classes, and I always tell my students this is their social time to chat, and not look too closely at their felting. I felt a few berries at a time, trying to keep the size and shape all the same.


 I felt 20+ berries, setting them aside to dry before gluing them into place. I alternate felting with cutting so my hands don't get too tired. Back to cutting leaves. It's a nice shape, but needs more.


So I add more wires, more leaves. Start adding the berries. Finally I'm happy with it, and am almost sad to be done. Art as therapy, I was able to escape this strange-like-a-bad-dream world for a little while. The wreath reminds me a bit of mistletoe, symbolic of "divine love and healing, harmony and goodwill". Kind of like art. It's helped me once again. Today I shipped the wreath to its new home, my cousin's daughter. I sent it on its way with the wish of infusing their home and family with the same feeling of peace and hope it helped me find. We will get through this, tomorrow is another day.


Monday, January 20, 2020

Silk Scarf-dyeing at SECU house

I always enjoy visiting SECU house and sharing my skills with the out-of-town patients and their caregivers there. They are so appreciative of the opportunity to do something creative with others and escape into an artsy environment for just a little while. And it's truly a wake-up call for me, my problems pale in comparison to what some of them are going through. Silk scarf-dyeing is one of our favorite activities, too, it's so much fun, fast and easy! I love seeing what my students create, you never know how the scarves are going to turn out. Last time there we had a fellow who dyed a scarf for his wife, and came out with butterflies! So proud of all of my students, here is some of their gorgeous work.
 This artist was so happy with her beautiful ocean hues!
 I love how some of the colors separate in the dyeing process, what a nice surprise!
 This artist dyed this vibrant scarf for his wife, and got a bevy of beautiful butterflies!

I love the soft, happy colors in this scarf this young lady dyed, gorgeous!

Wool Geode Zipper Necklace class

We had such a fun time making these Wool Geode Zipper Necklaces at Maleku Jewelry a couple of weeks ago! The students learned how to make a wooly geode, how to wet-felt the wool beads, and how to assemble this artsy necklace. They got to choose from some pre-felted items too, coordinating colors with their own felted wool beads, so that we didn't spend all day felting but much of the time creating. I love how they all turned out, and I think everyone was happy with their work too! Here are a few pictures of their gorgeous necklaces.
 Diane ready to assemble her beautiful necklace, above. Love these earthy hues she chose!
This piece will look great with black, white, or even denim!
 Ileana added a bit of bling to her hand-felted purple beads!
 Some of my favorite colors, love those teals and greens!
This artsy student added lots of bead embellishments to her gorgeous piece as well as an asymmetric look, so unique!
Beautiful shades of amethyst and plum harmonize perfectly with the wool geode here!
 In the afternoon these hard-working gals felted wallets! They did an amazing job, the pictures don't do justice to these beautiful pieces.
I really enjoyed teaching this fun group of gals! Looking forward to going back to Greenville and teaching at the shop again sometime. And a special bonus - I get to visit my son and dil while I'm there too! It's a win-win for everyone.