With Easter just behind us, I thought this would be a good time for a tutorial on dyeing with Easter egg dye. You can snag the dyes for mere pennies after the holiday, I dyed all of this wool for under a dollar. Here's how you do it, enjoy!

I decided to try dyeing a variety of wools: left to right, I chose a wool plaid, 100% Woolfelt, wool boucle, wool herringbone, wool yarn, wool dryer lint, wool "nubbies", and a silk-like fabric I was unsure of the fiber content. I chose to dye them purple, the purple Easter egg dye is a bit unstable and tends to separate into several shades of lavender and blue, which I love! Gives it a nice hand-dyed look. Remember...this is for protein fibers only, like wool, and will not work on cottons.

I wrapped the wool dryer lint and wool "nubbies" in a small piece of tulle and tied it with wool yarn to keep them together during the dyeing process.

Fill a basin with room-temperature water and add a squirt of soap; I use Dawn dishwashing liquid, the concentrated kind. If you're not dyeing anything that might felt (like wool fibers) you can use warm water. You're opening up the wool fibers so they'll accept the dye better.

Add the wool to the soapy water and let it soak about 30 minutes, or longer is fine.

Meanwhile, mix up the Easter egg dye. Here are my no-frill supplies: egg dye, plastic containers for dyeing, plastic spoon, tablespoon, measuring cup, white vinegar, water, paper towels for spills.

Cool, Easter egg dye comes with fibers now! Not wool though. Choosing purple (I hope.)

Place 3 tablespoons of white vinegar into a bowl or small container and plop the tab in. Wow, this little guy is motoring around the bowl! Let tab dissolve completely, then add a half-cup of water and another tablespoon of white vinegar.

Do a little wool sample test to check the color, it can be hard to tell with those tiny dye tabs. Looks good!

Remove items from the basin and gently squeeze out the soapy water (it shouldn't be too soapy, if it is, you can rinse out the wool fabrics a bit.) Arrange wool in an aluminum roasting pan or oven-safe container you don't need for cooking.

Add the dye to your wet wool. You can pour it, spoon it, paint it on with a sponge brush, whatever you'd like. If your pieces are overlapping, be sure to lift them up to add dye to the wool underneath. I used 4 tabs of purple dye for this wool, mixing each with 3 tablespoons of white vinegar, then a half cup of water. When all the dye is added, place in oven and turn to 225 degrees. Cook, checking periodically to make sure the wool isn't scorching. If you've added enough liquid you should have no problem here.

After cooking the wool for 40 minutes, the color had a little more blue than I wanted. So I decided to warm it up a bit with a wash of pink dye. (Be sure and use pink, and not red; the red has more of an orange undertone, and will not mix with the purple as well.) I mixed one tab of pink with the 3 tablespoons of white vinegar; when dissolved, I added a good half-cup of water, and poured over my wool. Then I cooked it for another hour at 225 degrees.

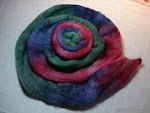
When the water is clear, your wool is done! Let cool completely; meanwhile, run room temperature water in a couple of rinse basins. When wool is cool, gently squeeze out water and add to rinse basins. Let soak a couple of minutes, remove, gently squeeze out water, and towel dry. Let wool dry flat.

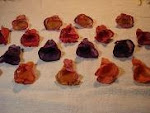
I love the way these turned out! Notice how the upper part of my 100% Woolfelt is more blue, that's where I didn't lift up the red fabric when adding the pink wash...I like it, it gives me an extra color. Do keep in mind, these directions are for protein fibers only. I had best results from the cream 100% Woolfelt, 2nd from left, this fabric just slurped that dye right up! I was a little disappointed in the black 'n white plaid on the far left. The wool boucle also dyed beautifully, as did the herringbone, wool bits and yarn. I guess the wine-colored "silk" wasn't silk after all, but a synthetic; the color did not change at all, only dulled it a bit with the addition of the soap and water. You can also dye protein fibers in Kool-aid, the colors are a bit more limited, though. No need to add vinegar to the Kool-aid (kind of a scary thought, huh!)One pack of Kool-aid mixed with a half cup of water (or enough to cover your wool) will dye a 9" square of wool in a nice rich color, and you can do it in the microwave: zap for 2 minutes, let rest for 2 minutes, zap 2, rest 2. When all the color has gone into the wool, you're done! (Or when you reach the color you want.) You can also go back and add color. And you can mix colors too; adding the complementary hue to a color will tone it down a bit (such as a pinch of green in with your red, etc.)Don't be afraid to experiment! This is also a fun activity to do with your kids...and it's safe, no gas-mask required.=)Have fun with it!